Introduction
We’re excited to announce the launch of the Nylas API v3. To harness the latest capabilities of the Nylas Email API v3, let’s explore how to create an advanced email workflow with the TinyMCE Rich Text Editor.
In this blog post, let’s dive into integrating mail merge and email template functionality using TinyMCE Text Editor, with messages sent using the Nylas Email API.
Email templates and mail merge are advanced features that enable dynamic, personal, and consistent communication. We’ll explore these advanced features using the Tiny plugin ecosystem. TinyMCE is a powerful rich text editor for building and editing email templates.
Let’s build on our last blog post where we built an email inbox using React, TinyMCE, and Nylas Email API, so for setup instructions and getting started, checkout How to Send Emails using TinyMCE Rich Text Editor. For the code in this blog, we’ve created a separate branch with code changes for templates and mail merge to follow along.
Understanding mail merge and email templates
Mail merge allows the user to mark specific sections of a message using tags (i.e., {{placeholder}}) that can be replaced with personalized data and sent in bulk. This allows messages to target specific users with more relevant details that increase the chance of email engagement.
Email templates are reusable structured formats that ensure consistency in design and layout. Templates can also contain placeholders for dynamic content such as mail merge. Templates include pre-written content with placeholders to personalize the message, such as the contact’s name. For example, consider a reminder being sent out to clients to re-book an appointment with a previously visited healthcare provider. Email templates optimize the messaging efforts by providing a structured format that can be modified, revised, and customized for specific use cases.
Implementing mail merge with TinyMCE
Let’s take a look at how to add mail merge tags to messages using TinyMCE. Examples of use cases are personalized greetings, newsletters, and promotional offers that can take advantage of mail merge.
In general, here are the complete steps to get started with mail merge:
- Prepare data: Organize recipient data in a structured format to consume programmatically (i.e. CSV file) with a column to represent each placeholder
- Add placeholders: Insert placeholders using TinyMCE (e.g.,
{{FirstName}}, {{Company}})
- Merge and send: Programmatically merge the data with the placeholders and send the emails
We previously covered steps 1 and 3 on how to convert the merge tags to personalized data. Let’s go over how to do step 2 next!
To add mail merge to TinyMCE, we need to update the <Editor> component, specifically the init prop to include the mergetags plugin and an initial list of merge tag options (prop mergetags_list)
< Editor
  ...
  init = {
    {
      plugins: 'mergetags',
      toolbar: 'mergetags',
      mergetags_list: [
        // mergetag list format [{value: value to insert}, {title: label to display}]
        {
          value: 'First.Name',
          title: 'First Name'
        },
        {
          value: 'Email',
          title: 'Email'
        },
        {
          value: 'Current.Date',
          title: 'Current date in DD/MM/YYYY format'
        },
        {
          value: 'Current.Time',
        },
        {
          title: 'Person',
          menu: [{
            value: 'Person.Name.First',
            title: 'first name'
          },
          {
            value: 'Person.Name.Last',
            title: 'last name'
          },
          {
            value: 'Person.Name.Full',
            title: 'full name'
          },
          {
            title: 'Email',
            menu: [{
              value: 'Person.Email.Work'
            },
            {
              value: 'Person.Email.Home'
            }]
          }]
        }]
      }
    }
/>
Check out our nylas code samples for the code for adding merge tags. Now, we can insert merge tags in our email messaging workflow:
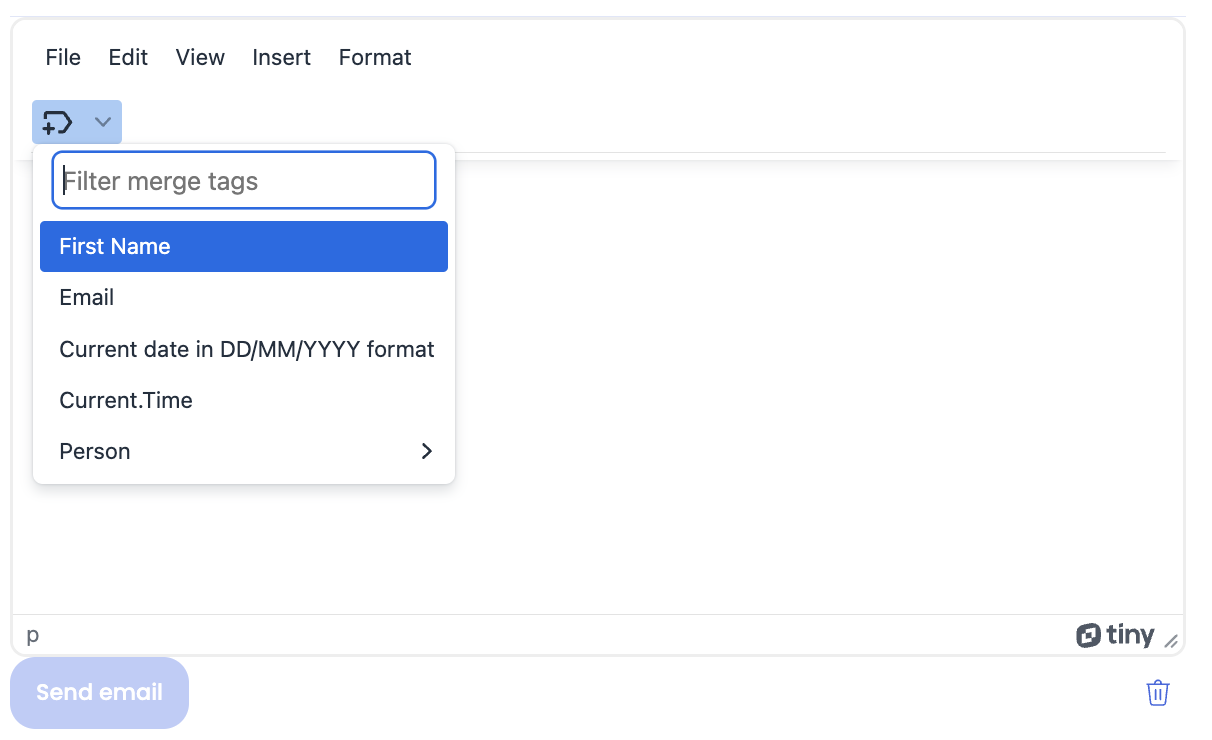
Now you can use TinyMCE to send personalized emails!
Implementing email templates with TinyMCE
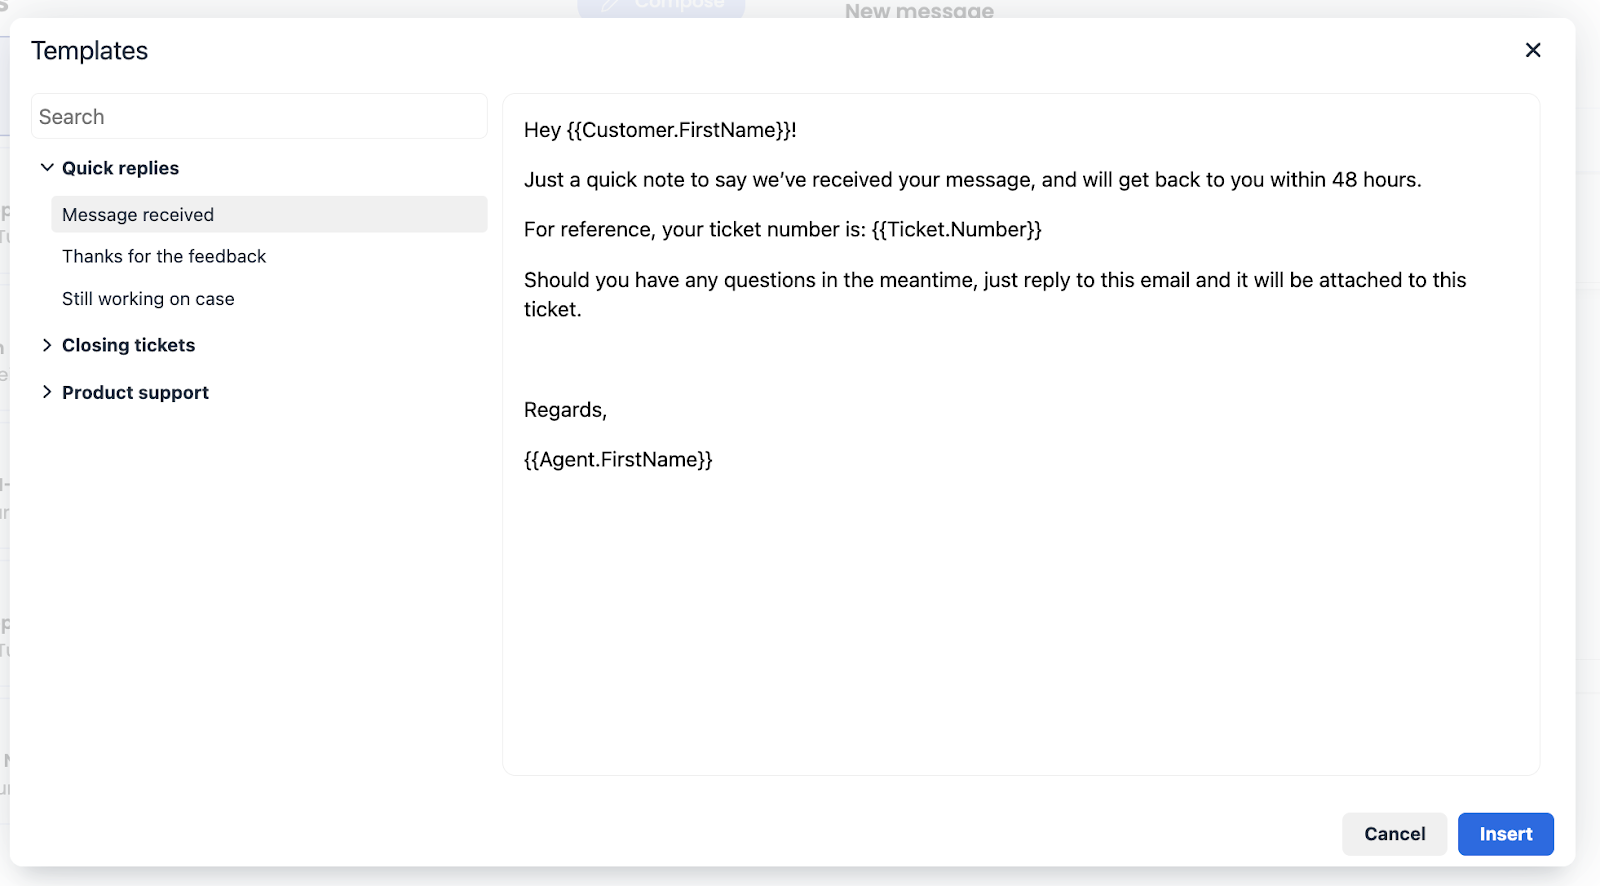
TinyMCE simplifies creating and editing email templates. To get started, let’s store the following email HTML templates as template_data that could also be later fetched from a server:
const template_data = [
{
title: 'Quick replies',
items: [
{
title: 'Message received',
content: '<p dir="ltr">Hey {{Customer.FirstName}}!</p>\n<p dir="ltr">Just a quick note to say we’ve received your message, and will get back to you within 48 hours.</p>\n<p dir="ltr">For reference, your ticket number is: {{Ticket.Number}}</p>\n<p dir="ltr">Should you have any questions in the meantime, just reply to this email and it will be attached to this ticket.</p>\n<p><strong> </strong></p>\n<p dir="ltr">Regards,</p>\n<p dir="ltr">{{Agent.FirstName}}</p>'
},
{
title: 'Thanks for the feedback',
content: '<p dir="ltr">Hi {{Customer.FirstName}},</p>\n<p dir="ltr">We appreciate you taking the time to provide feedback on {{Product.Name}}.</p>\n<p dir="ltr">It sounds like it wasn’t able to fully meet your expectations, for which we apologize. Rest assured our team looks at each piece of feedback and uses it to decide what to focus on next with {{Product.Name}}.</p>\n<p dir="ltr"><strong> </strong></p>\n<p dir="ltr">All the best, and let us know if there’s anything else we can do to help.</p>\n<p dir="ltr">-{{Agent.FirstName}}</p>'
},
{
title: 'Still working on case',
content: '<p dir="ltr"</p>\n<p><strong> </strong></p>\n<p dir="ltr">Hi {{Customer.FirstName}},</p>\n<p dir="ltr">Just a quick note to let you know we’re still working on your case. It’s taking a bit longer than we hoped, but we’re aiming to get you an answer in the next 48 hours.</p>\n<p dir="ltr">Stay tuned,</p>\n<p dir="ltr">{{Agent.FirstName}}</p>'
}
]
},
{
title: 'Closing tickets',
items: [
{
title: 'Closing ticket',
content: '<p dir="ltr">Hi {{Customer.FirstName}},</p>\n<p dir="ltr">We haven’t heard back from you in over a week, so we have gone ahead and closed your ticket number {{Ticket.Number}}.</p>\n<p dir="ltr">If you’re still running into issues, not to worry, just reply to this email and we will re-open your ticket.</p>\n<p><strong> </strong></p>\n<p dir="ltr">All the best,</p>\n<p dir="ltr">{{Agent.FirstName}}</p>'
},
{
title: 'Post-call survey',
content: '<p dir="ltr">Hey {{Customer.FirstName}}!</p>\n<p dir="ltr"> </p>\n<p dir="ltr">How did we do?</p>\n<p dir="ltr">If you have a few moments, we’d love you to fill out our post-support survey: {{Survey.Link}}</p>\n<p><strong> </strong></p>\n<p dir="ltr">Thanks in advance!<br>{{Company.Name}} Customer Support</p>'
}
]
},
{
title: 'Product support',
items: [
{
title: 'How to find model number',
content: '<p dir="ltr">Hi {{Customer.FirstName}},</p>\n<p><strong> </strong></p>\n<p dir="ltr">My name is {{Agent.FirstName}} and I will be glad to assist you today.</p>\n<p dir="ltr">To troubleshoot your issue, we first need your model number, which can be found on the underside of your product beneath the safety warning label. </p>\n<p dir="ltr">It should look something like the following: XX.XXXXX.X</p>\n<p dir="ltr">Once you send it over, I will advise on next steps.</p>\n<p><strong> </strong></p>\n<p dir="ltr">Thanks!</p>\n<p dir="ltr">{{Agent.FirstName}}</p>'
},
{
title: 'Support escalation',
content: '<p dir="ltr"></p>\n<p><strong> </strong></p>\n<p dir="ltr">Hi {{Customer.FirstName}},</p>\n<p dir="ltr">We have escalated your ticket {{Ticket.Number}} to second-level support.</p>\n<p dir="ltr">You should hear back from the new agent on your case, {{NewAgent.FirstName}}, shortly.</p>\n<p><strong> </strong></p>\n<p dir="ltr">Thanks,</p>\n<p dir="ltr">{{Company.Name}} Customer Support</p>'
}
]
}
];
To add templates, we need to update the following in the <Editor> component with the following changes:
- Add the
advtemplate plugin
- Pass in
template_data as advtemplate_templates
- Populate
advtemplate_templates with the transformed data to display to the user
The code changes to include templates are as follows:
<Editor
   ...init={{
      plugins: 'advtemplate mergetags',
      toolbar: 'mergetags inserttemplate addtemplate',
      contextmenu: 'advtemplate',
      advcode_inline: true,
      advtemplate_templates: template_data,
      advtemplate_list: advtemplate_list,
      mergetags_list: [/* previously added mergetags_list */]
  }}
/>
One code snippet we did not include in this section, is how to generate the advtemplate_list data object accepted by the <Editor> component. Here is the code sample to the create function that transforms the data consumed by advtemplate_list to support displaying email templates to the user.
Now, we can insert email templates using TinyMCE in our email messaging workflow:
With TinyMCE configured with templates, you can format text, insert images, and add links directly within the editor, creating a visually appealing email template.
Build time!
In this blog, we explored how to add merge tags and email templates to our users’ messaging workflow using TinyMCE. TinyMCE is a powerful tool for creating and editing email templates, and for implementing mail merge functionality. Start building your email templates with TinyMCE today and for setup instructions, check out Send Emails using TinyMCE Rich Text Editor.
You can sign up for TinyMCE and Nylas for free and start building! To continue building with Nylas, explore various quickstart guides or visit the Nylas developer documentation.
 Email and Contacts API
  Calendar API & Scheduler
  Notetaker API
  Agent Accounts


