 Email API
 Calendar API
 Contacts API
  Scheduler
 Notetaker API
 Google email & calendar integration
 IMAP integration
 Zoom integration
 Inspiration gallery
Build a Slackbot Scheduler in 30 Minutes!
• 25 min read

The days of leaving Slack to create an event on your calendar are over!
In this tutorial, you are going to learn how to create a scheduler bot that adds events to your personal calendar with a simple Slack slash command using the Nylas Calendar API.
There are a few systems that you’ll need to have in place before embarking on this DIY Slack bot journey!
Here are the high-level steps involved in building the scheduling bot:
Step 0: Fork the Slackbot starter code
The code for this project lives in a repository on the Nylas Github account at https://github.com/nylas/slackbot.
You are going to fork and then clone this repository instead of just cloning it so that you have your own repository that you can connect to Heroku. Follow these steps from Github to fork the repository. Follow the steps up until “Find another repository to fork”.
After, you will have a local copy of a directory called slackbot . This directory has five files:
For the rest of the tutorial, you will be executing all of your commands in the /slackbot directory
In addition to the master branch, which you will be on by default, this repo also contains five other branches corresponding to each part of the tutorial. You can stay on the master branch as you build your Slack bot, but if you get stuck at any step then you can see the difference between your code and the example application code by using git diff <part-#>. So if you get stuck during Part 4, git diff part-4 will show the difference between your code and the example code after part 4.
Step 1: Run the Script
The setup script sets up your development environment and installs necessary dependencies. Run:
source setup.sh
After this script completes it will print “Set up complete!” in your terminal
This script will have activated a virtual environment which you will use to keep the development of your project isolated. If your terminal prompt is now prepended with (.venv) your virtual environment has successfully been activated!
If you are interested in learning more about virtual environments and python3 check out https://help.dreamhost.com/hc/en-us/articles/115000695551-Installing-and-using-virtualenv-with-Python-3
Step 2: Run the app locally
export FLASK_ENV=development

python3 app.py
You should see:
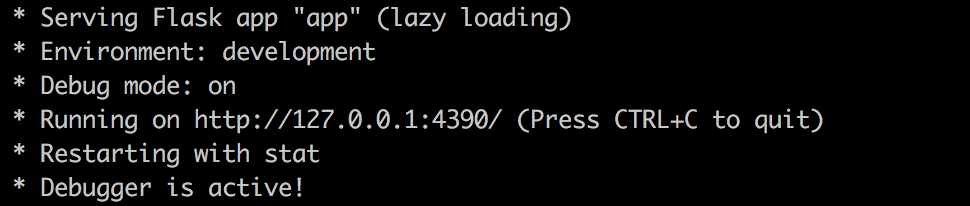
If you visit the URL on the 4th line that the app is running on, you will see Howdy Hacker!
Wohoo! You made it through the app set up. Pat yourself on the back and crack open a La Croix.
Step 0: Create a new Heroku app
You could use DigitalOcean or DIY if you’d prefer but these instructions will be for Heroku.
Log in to heroku: https://id.heroku.com/login, and create a new application by clicking new in the top right corner and completing the new app form
You can enter your own app name or leave it blank and let Heroku generate one for you! Make note of this url as you will need it in Part 3 when you connect your application to Slack.
Step 1: Hook up your Github repo to Heroku
Heroku has an integration with Github which enables automatic deploys. This means that whenever you push code to a branch on Github, Heroku will deploy this code. How handy is that!
On the deploy page that you get redirected to after creating an application, in the Deployment method section, click Connect to GitHub and then in the Connect to Github section, click the Connect to GitHub button.
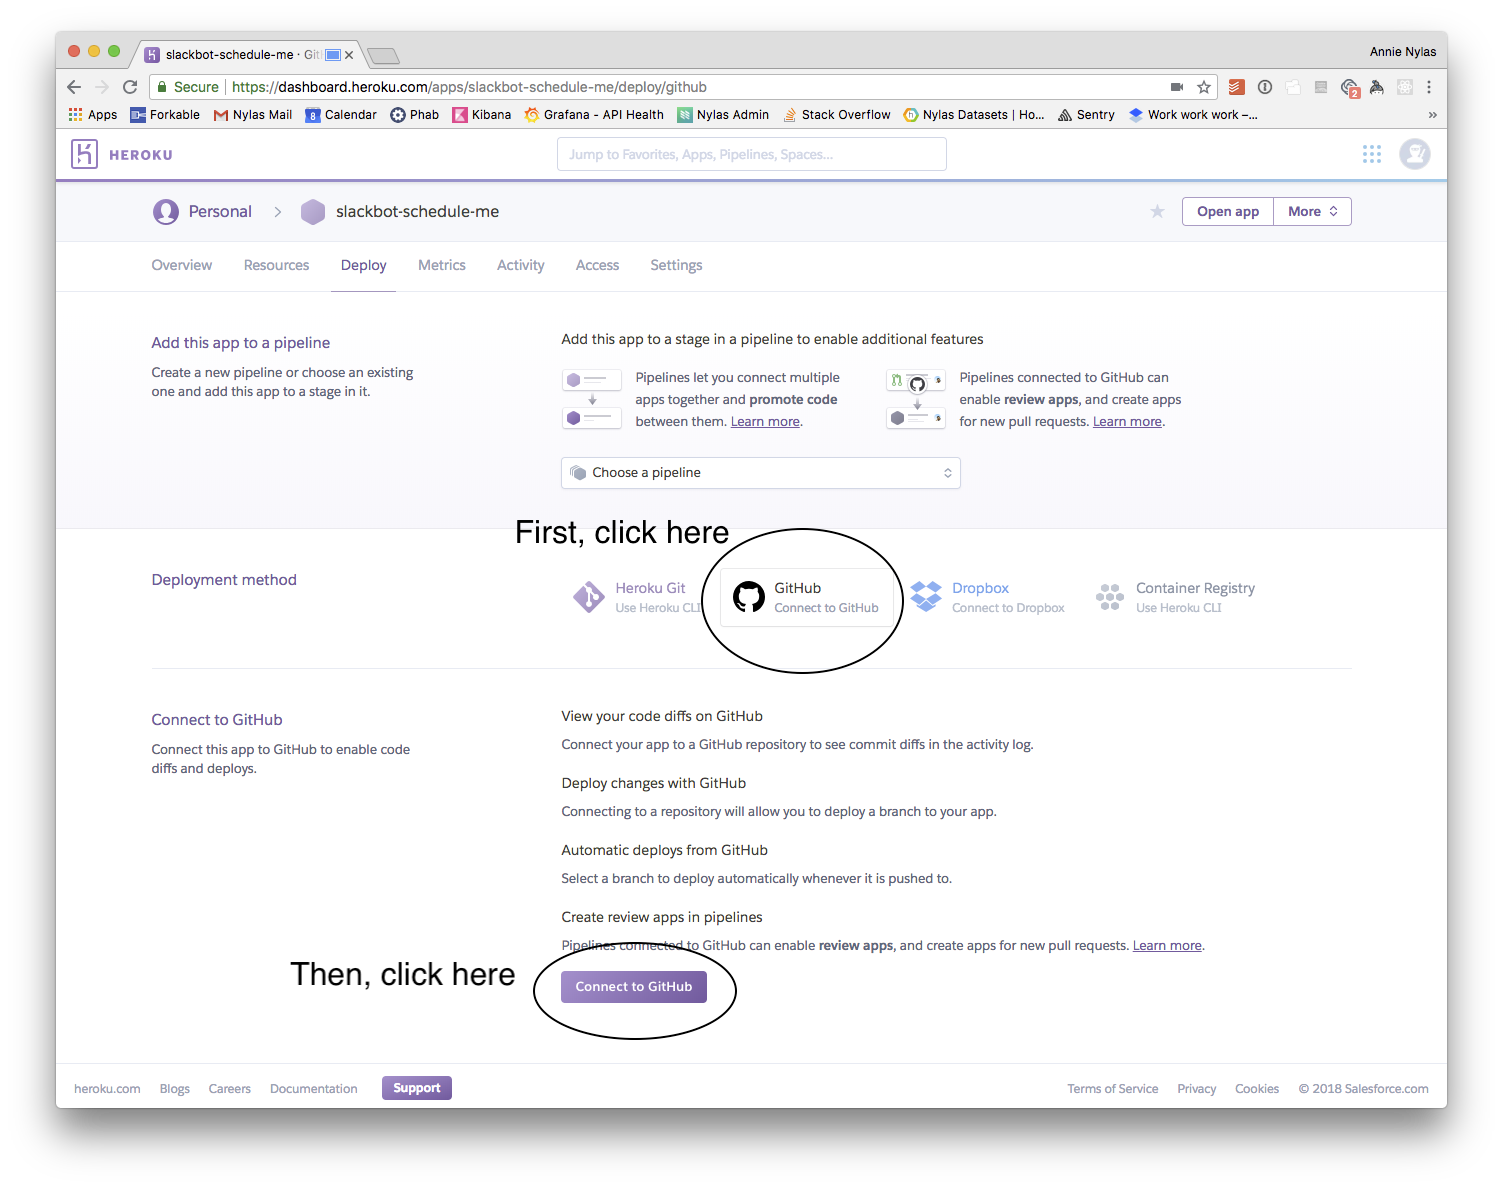
Next, you will be taken to a page where you can select which repository to connect. If you have successfully created a repository under your github account, then it should come up when you start to type the repository name into the input.
Once you have connected up the repository, click Enable Automatic Deploys for the master branch. This will simplify the deploy process so that any time you push to master, heroku will deploy the latest changes.
It’s important to note that if you start working on a branch other than master, then you will not have automatic deploys. You can manually deploy code from another branch if you push your code to the other branch select that branch from the manual deploy section and click Deploy Branch.

Keep Heroku open because you will need it in Part 4 – Step 3.
Step 2: Push code to master to trigger a deploy
Quit your locally running app with CTRL+C.
The route should now look like
@app.route('/')
def homepage():
return "Howdy hacker!!"
In your terminal, run:
git add .
git commit -m 'Part 1: Hook up repo to Heroku'
git push origin master
After this deploy is complete — it may take a few seconds — visit the url of your app. You should be greeted with the message Howdy Hacker!!. Your website is live and ready to welcome any hacker who visits the url, all thanks to the automatic deploy you configured.
Okay, so to make this work you need 2 major things. First, you need an access token that indicates that you have authorized your account to be accessed through the Nylas API. This is an important step because the API cannot add an event to any old calendar unless it has been authenticated and the owner has given permission. Second, you need the ID of the calendar you want to add events to. Most accounts have a few calendars — some autogenerated and some created by the user. Without this, the API would not know which calendar to send the request for.
Next, you’ll set these as config variables in Heroku so that you’ll avoid adding and committing them to code in your app.
In Step 0, you will get an access token and in Step 1, you will use this access token to find the ID for the calendar that you wish to add events to. Then, in Step 3 you will add these as config variables to your Heroku app.
Step 0: Get an access token
Head over to https://dashboard-v3.nylas.com/register to register for a free Nylas account or to https://dashboard-v3.nylas.com/login to sign in to an existing account. Once you’ve signed into the Nylas dashboard, click Accounts in the left side bar.
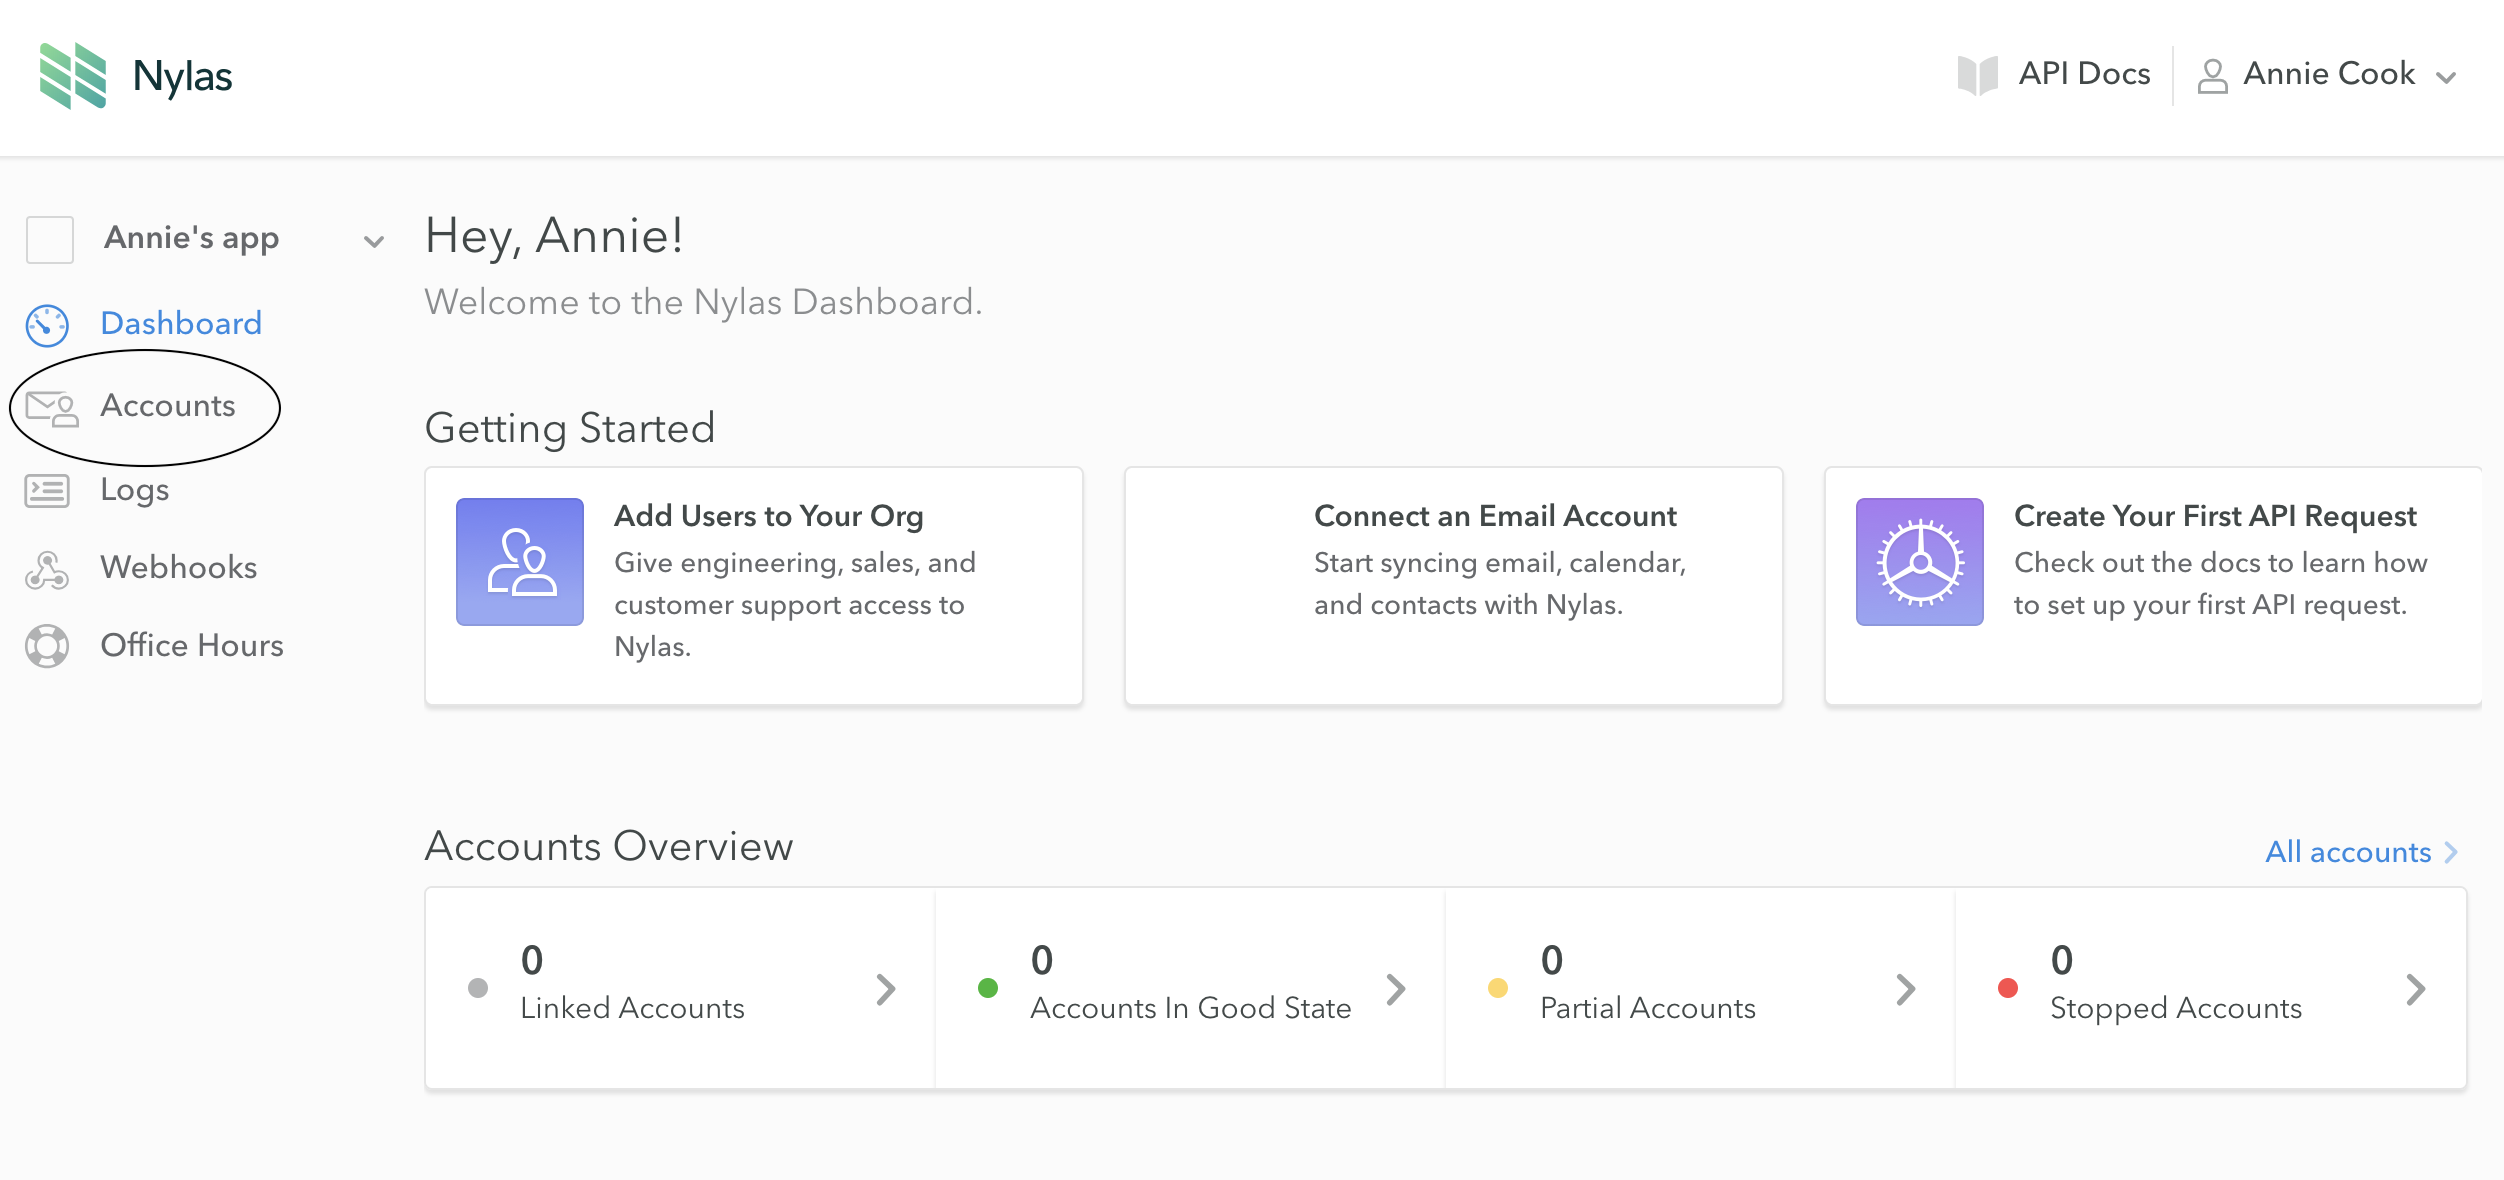
On the Accounts page, click Auth Account in either the top right or if you have no previously authed accounts, in the center of the page.
In the input window that pops up, type the email address associated with the calendar that you want to add events to and follow the authentication steps.
When you complete authentication, you will be redirected back to the Accounts page of the dashboard. At the top of the page will be a blue notification that looks like:
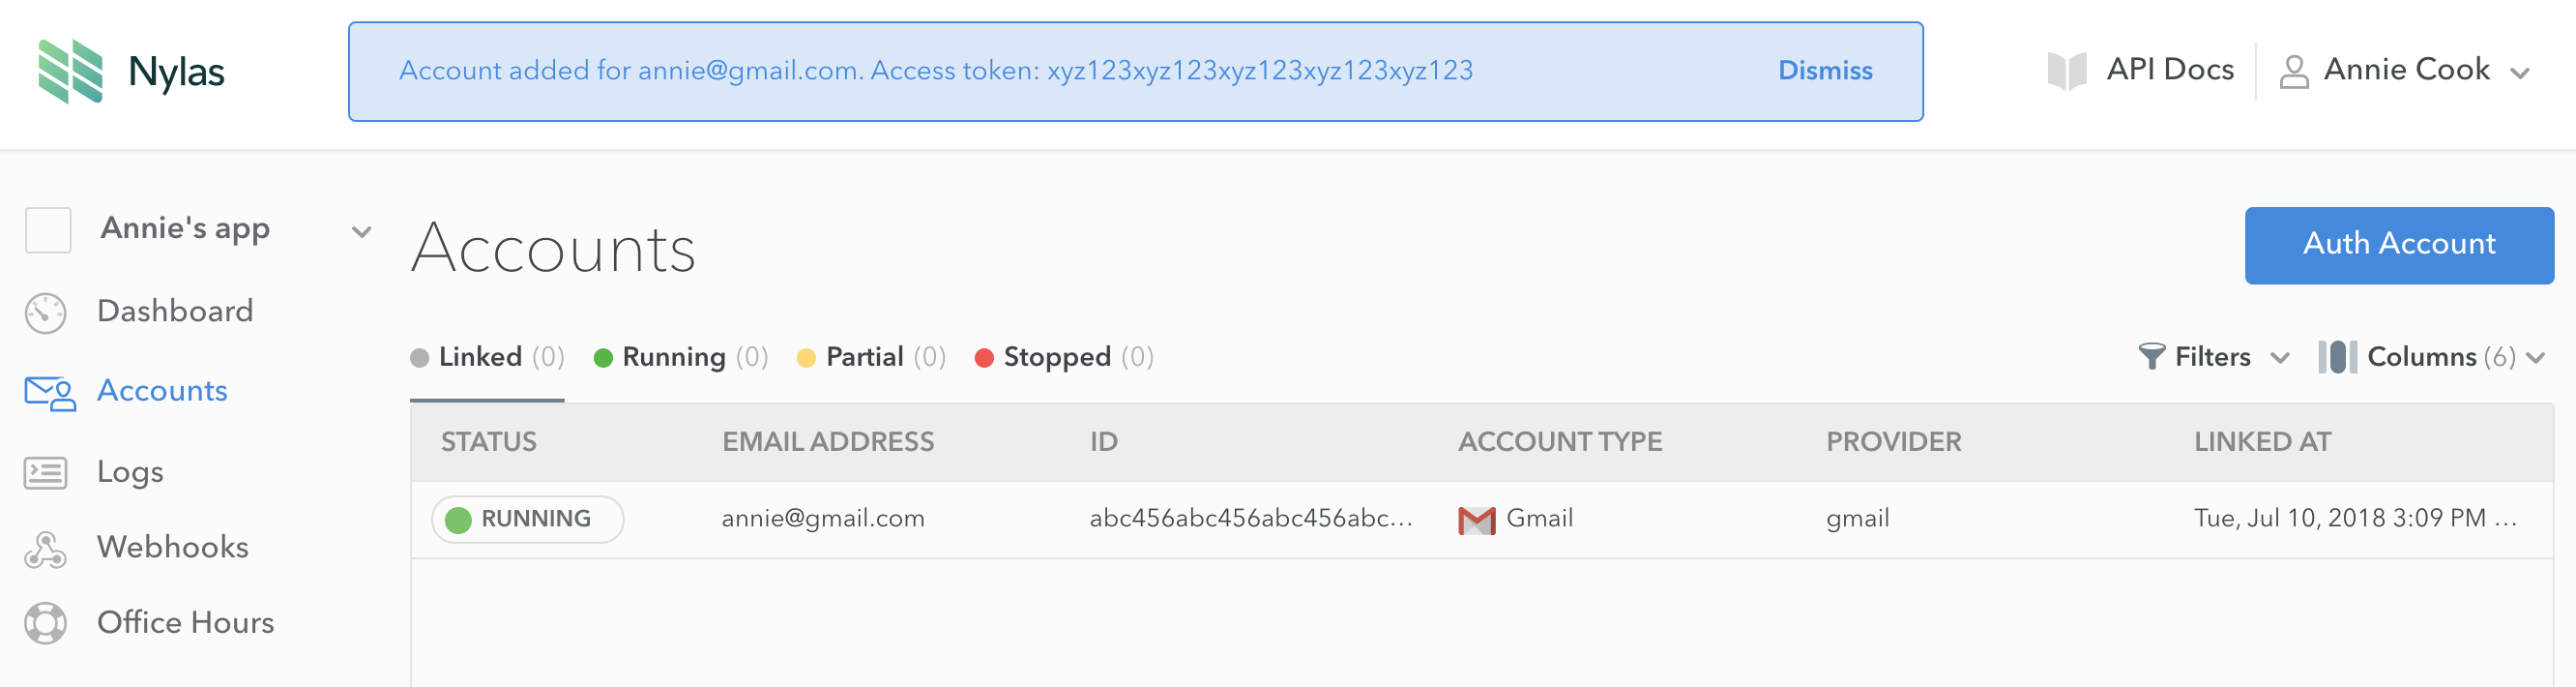
From the blue notification, copy the value of the access token to a temporary place — you will need this token in the following two steps. In this example, the access token is xyz123xyz123xyz123xyz123xyz123.
If you dismiss the notification or reload the page, the access token will disappear. For security reasons, there is no way to retrieve that specific token so if you lose your access token and need to get a new one, click Auth Account and follow the authorization steps. You can re-auth a previously authenticated account no problem! This will create a new access token for the account.
You will use this token first in the Nylas docs to get the ID of the calendar and second when you add it to Heroku config variables.
You can keep the dashboard page open and as long as you don’t navigate away or reload it, the blue notification with the access token will stay at the top of the page.
Step 1: Get the calendar ID
You can’t create an event without telling it what calendar it needs to be added to so you need to get the ID of the calendar you want to add events to.
Head over to https://docs.nylas.com/reference#calendars-1. This is the calendar section of the Nylas docs and specifically the GET /calendars endpoint. You could hit the Nylas API by making a request to https://api.nylas.com/calendars in your terminal, but the docs are interactive and make it possible to do in two steps within the site.
Paste your access token into the Authorization input field at the bottom of the inputs for this endpoint section.
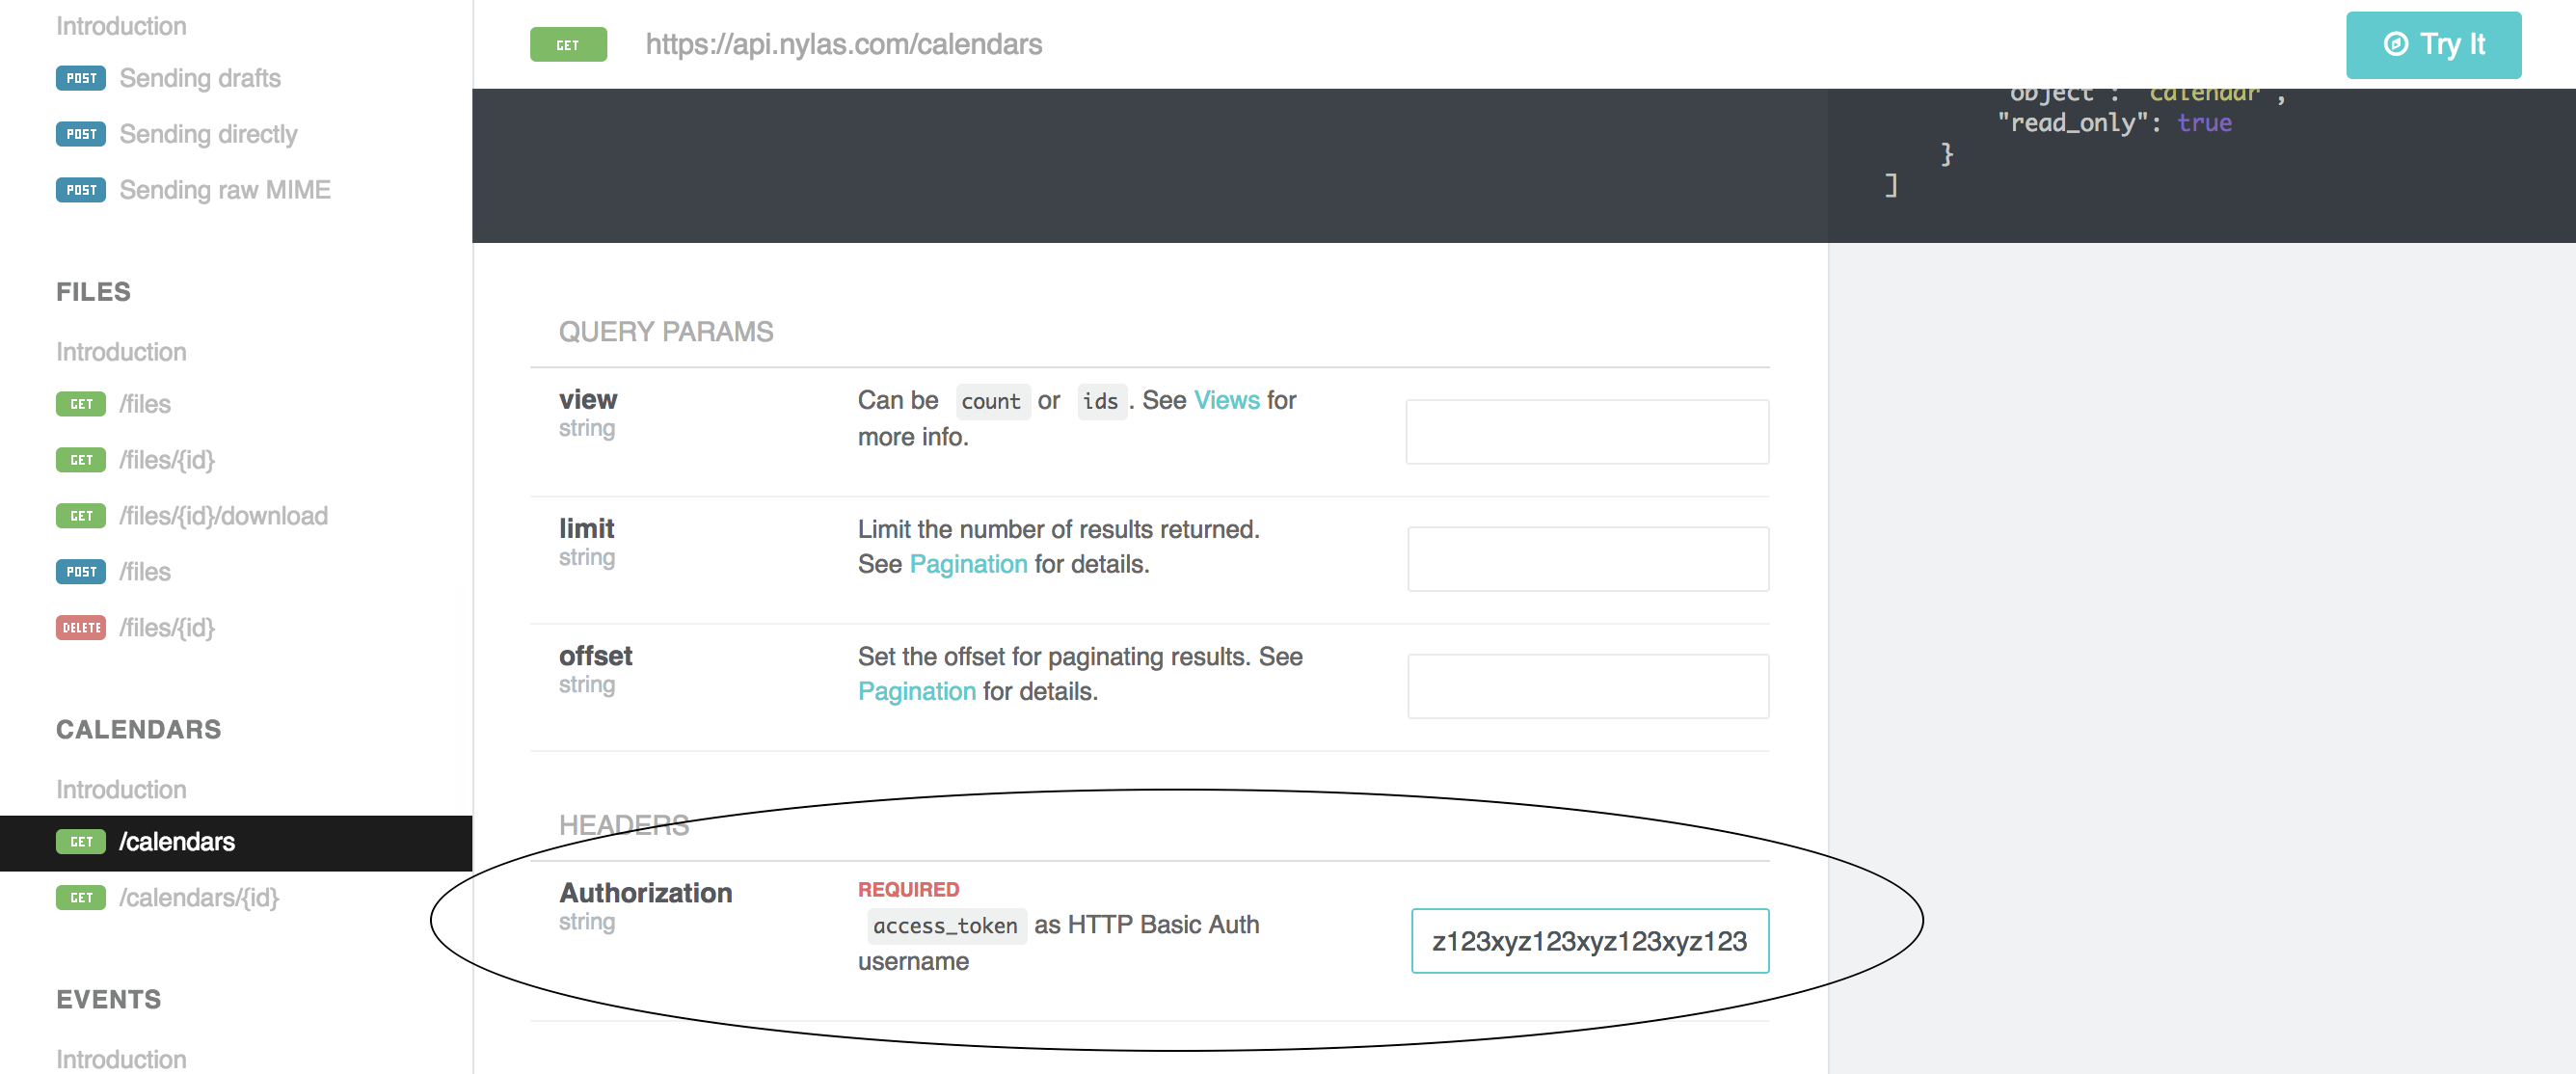
If you then scroll back up to the code in the dark box above, the authorization: will have been automatically filled out.
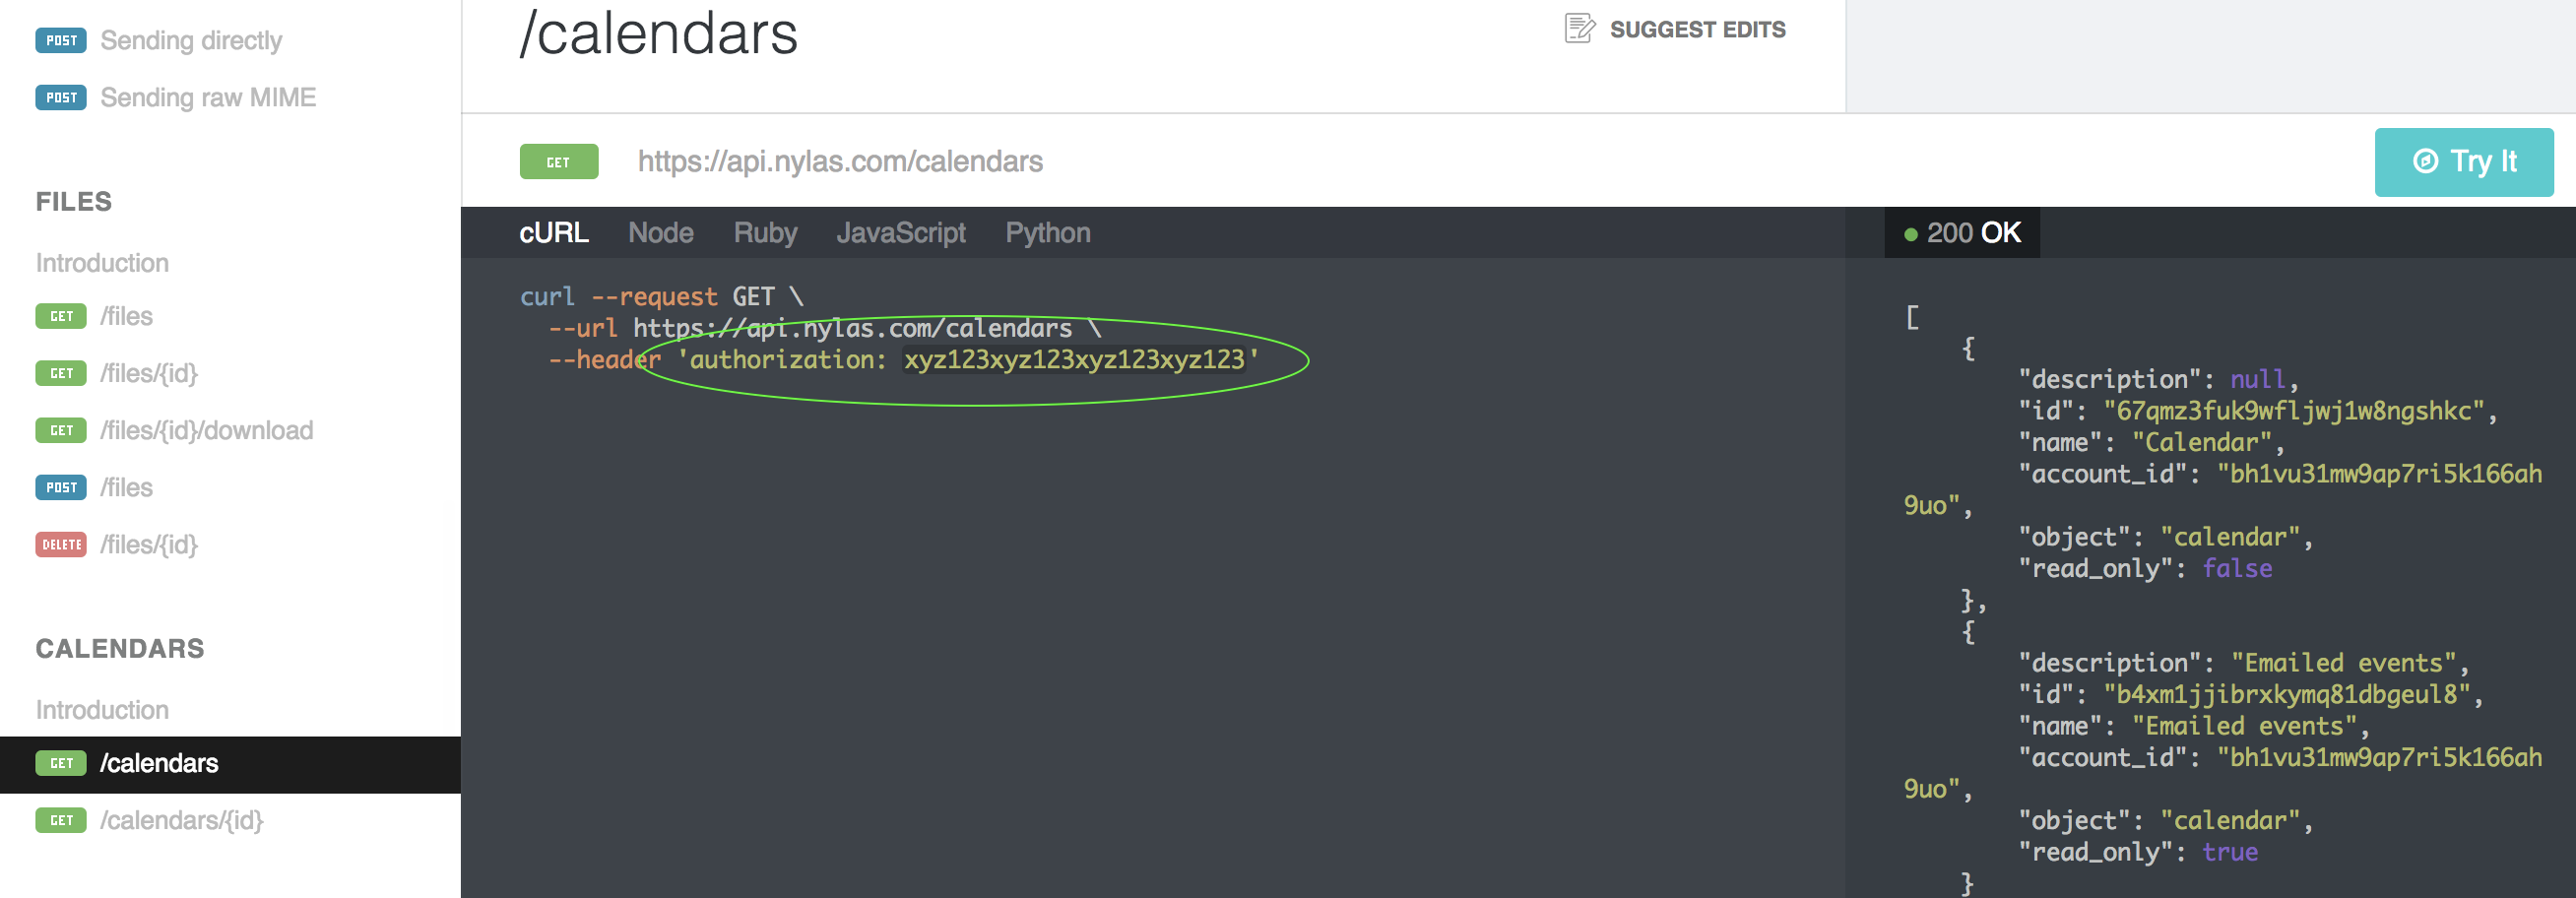
Next, click Try It in the top right corner. This will run the cURL request on the left and hit the Nylas API with your access token and display the response on the right. This will be a list of your calendars.
From the JSON list of calendars, select which calendar you want to add events to. Some of the calendars you may have never seen before. That is because some providers have default calendars that they automatically generate. One common example is “Holidays”. Often, these automatic calendars will have "read_only": True. This means that you don’t have permissions to create events on those calendars. It is important to select a calendar that has "read_only": False. Copy the id from your selected calendar.
In the example screenshot above, the id of the top calendar is "67qmz3fuk9wfljwj1w8ngshkc". You will have a different value after you run Try It because the ID will be a unique identifier to your calendar.
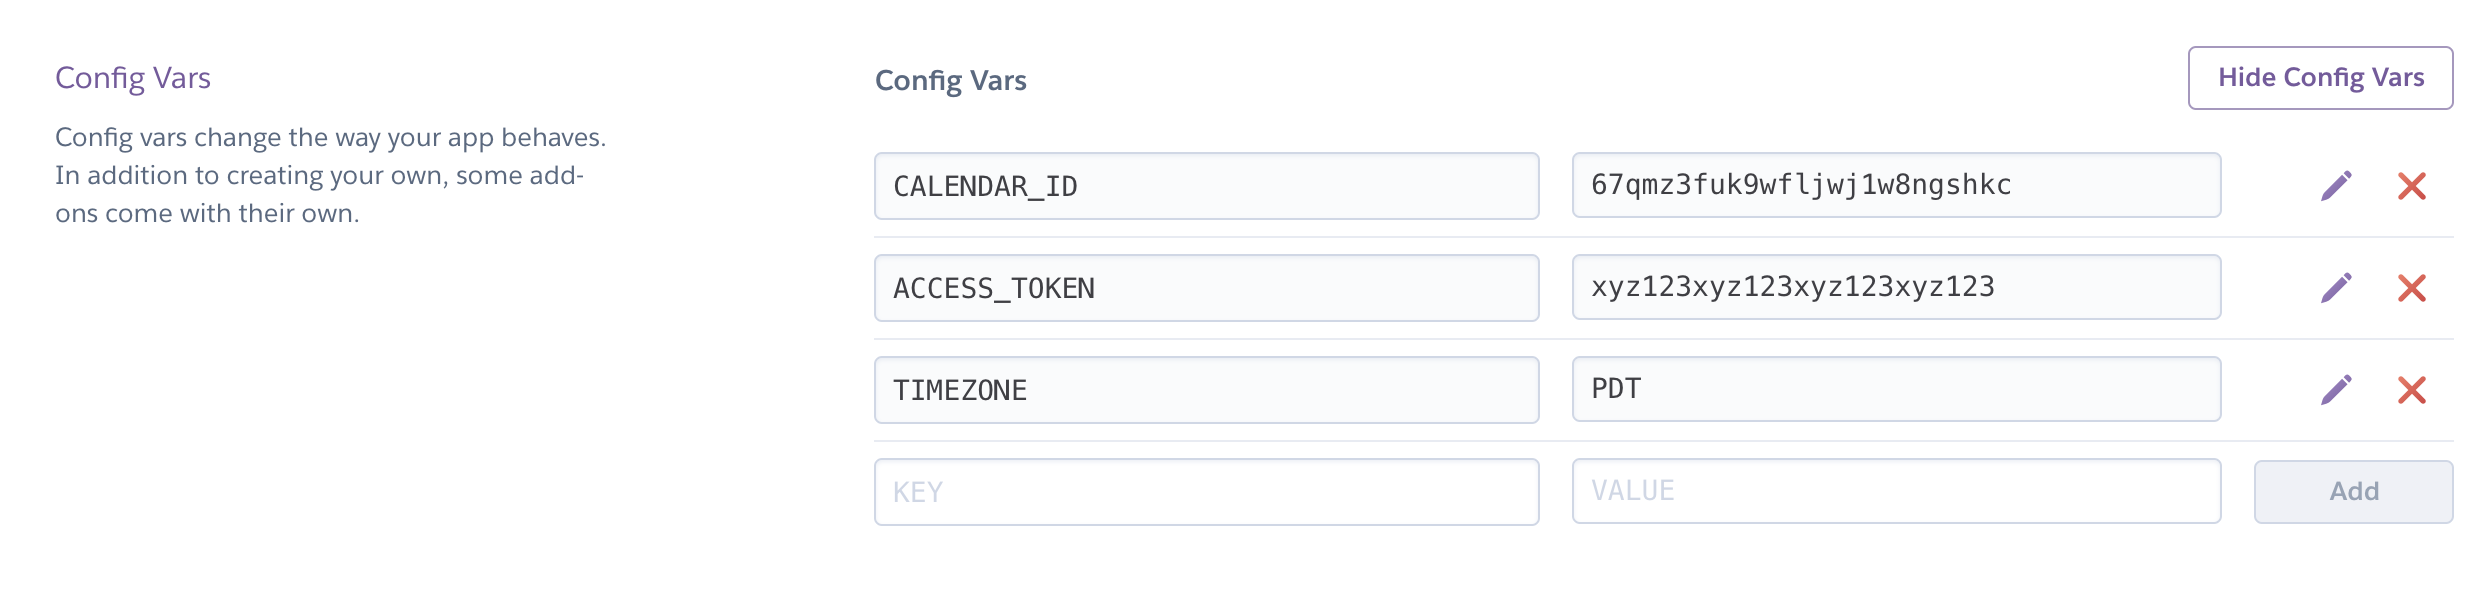
Step 2: Add config variables to Heroku
Go to Heroku and navigate to the settings page for your app. Click Reveal Config Vars. This will pop open a pair of inputs where the key, or how you want to refer to the variable in your code, is on the left and the value is on the right.
Add your calendar ID as a config variable with a key of CALENDAR_ID and a value of the ID that you copied in Step 1. Make sure to remove the double quotes from the ID.
Next, you are going to add the access token from Step 0 as a config variable with a key of ACCESS_TOKEN and the value from Step 0.
Finally, you need to add a config variable with your calendar timezone so that your calendar can properly schedule events. If you don’t pass the timezone, then your calendar will assume UTC (Universal Time Coordinated) also known as GMT (Greenwich Mean Time). If your calendar is in any other timezone, then the evens will show up shifted by the timezone UTC offset. Setting the timezone config variable will avoid this!
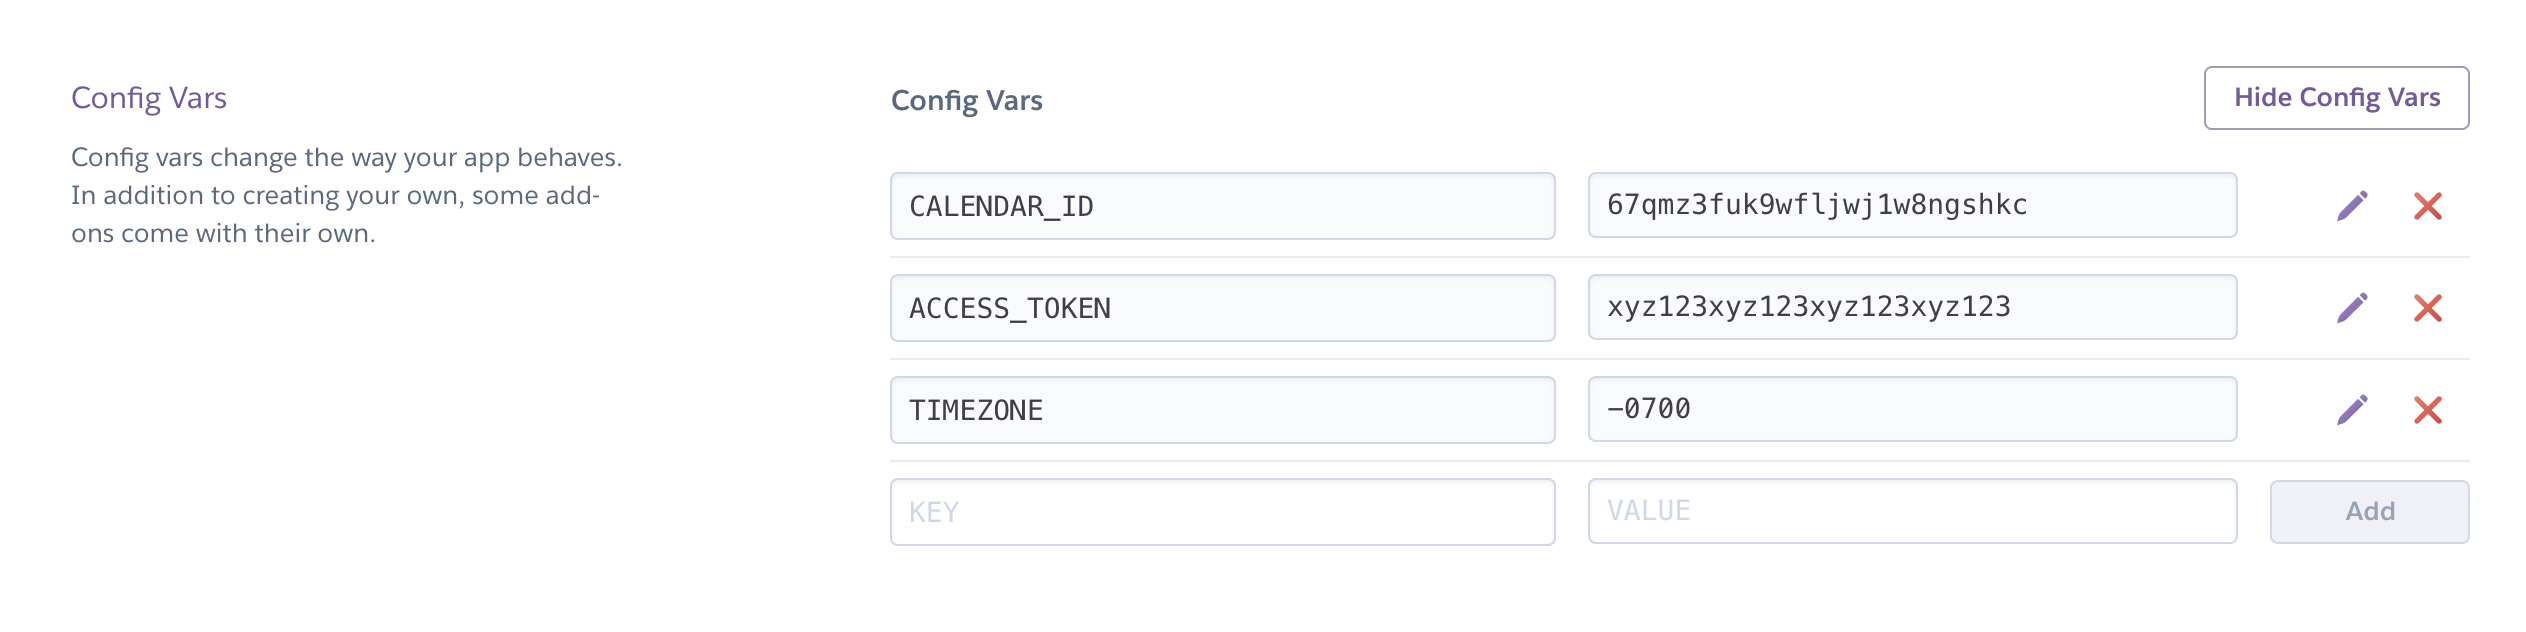
Since I am writing this in California and it is currently daylight savings, the value will be PDT. You can also set the value to the UTC offset, which for me would be -0700. You can find your timezone information here. If you want to use the UTC offset then it needs to be in the proper format. A timezone of UTC+10 would be +1000 and a timezone of UTC-3 would be -0300.
Here is how it looked for me:
Or with UTC offset:
Sweet now that everything in Heroku is configured, we can dive into the exciting next steps.
Step 1: Create a Slack app
Go to https://api.slack.com/apps?new_app=1. This is the landing page for building a new Slack app.
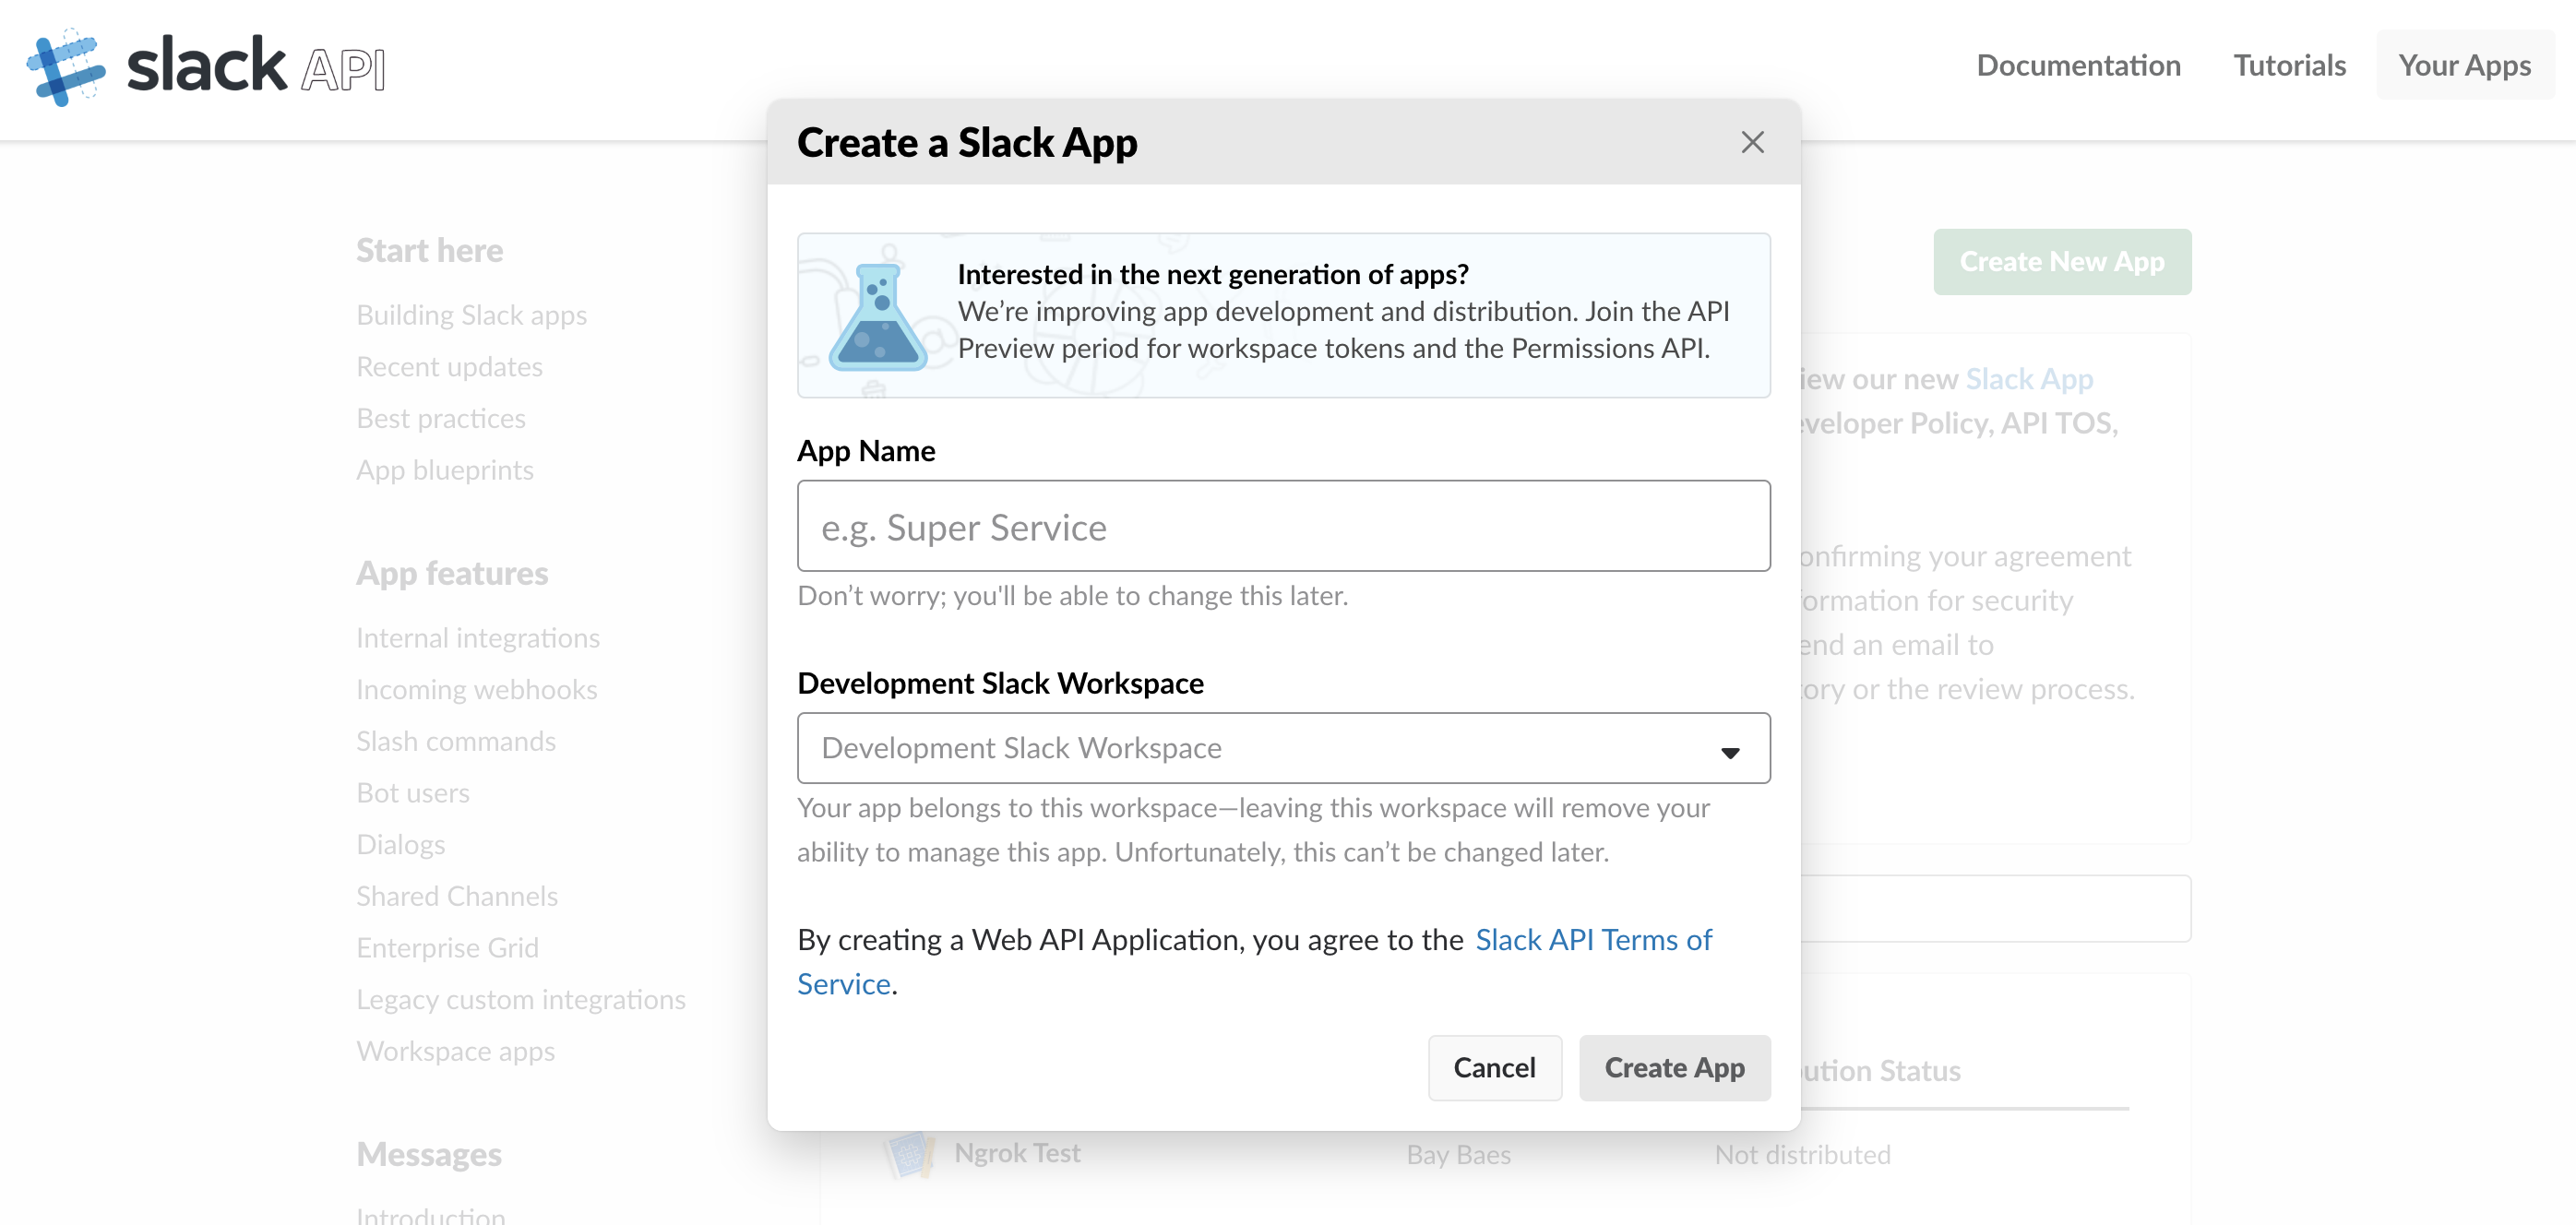
If the pop up above does not appear, click Create New App.
Fill in the App Name with “Scheduler” or whatever you would like to name this app. The name you select here is not too important.
Next select the development workspace in which you want to use this app. If you are not signed into your Slack account, when you click the Development Slack Workspace drop down the only option that will appear is Sign in to another workspace. Select this and follow these instructions. This will get you to sign into your workspace on desktop. Once this is successful, head back to https://api.slack.com/apps?new_app=1 and fill out the pop up again. This time, there should be workspace options in the dropdown. Select which workspace you want to add this scheduler app to and hit Create App.
Step 2: Configure Slack app
You will be taken to an app dashboard. Here, there are lots of options for what type of application and functionality you want to build. You will be making a slash command so select the Slash Commands option.
Then select Create New Command. This will take you to a slash command configuration form.
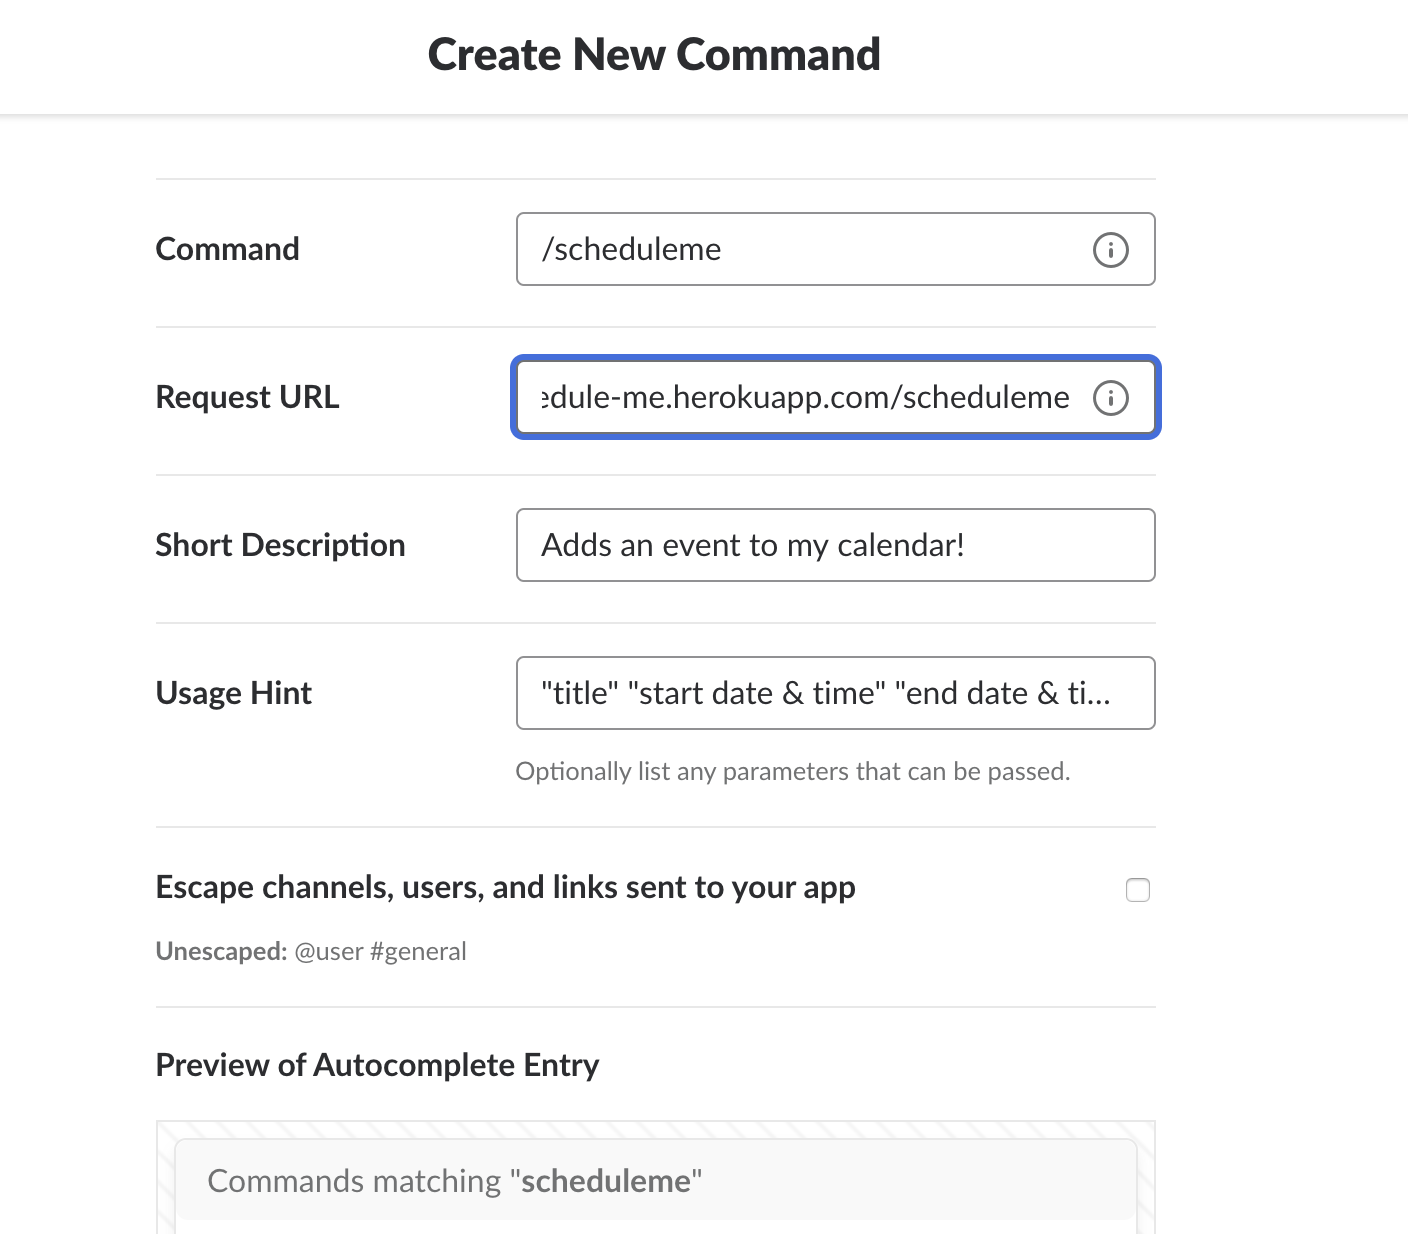
Command
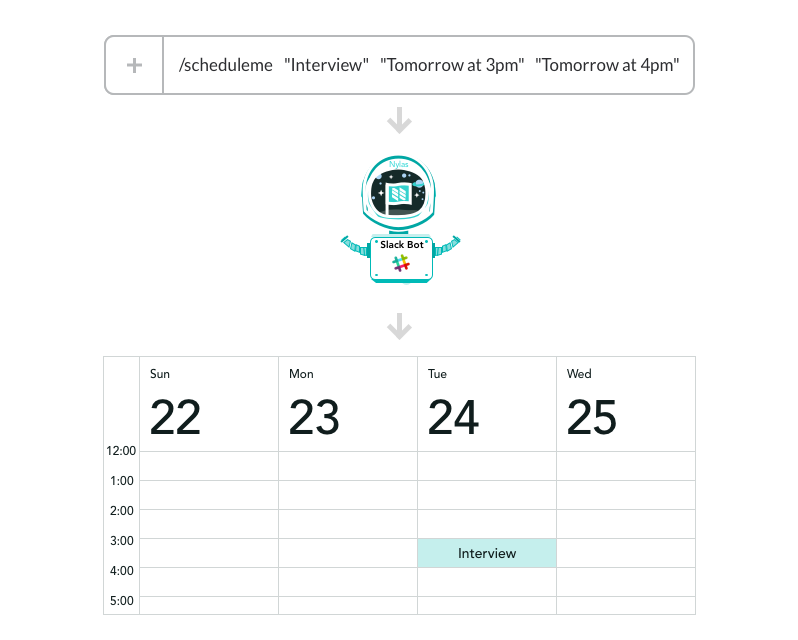
You can name the command however you want to invoke it when you use it. I choose /scheduleme because I think it looks cute when invoked in full:
/scheduleme "Dinner with James" "Tomorrow at 7pm" "Tomorrow at 9pm"
but you can select whatever slash command tickles your fancies.
Request URL
For the Request URL input, copy the url that your heroku app was deployed to on step 1 and paste it in the input. Then at the end of the url, add a /scheduleme so the url will look something like https://my-scheduler-bot.herokuapp.com/scheduleme.
This is setting up where Slack should send the request from the slash command. In otherwords, when you invoke a slash command, Slack needs to know where to send the data. This is specifying a url and a specific route on that url, /scheduleme. You will define this route in your python file in Part 5!
Short description
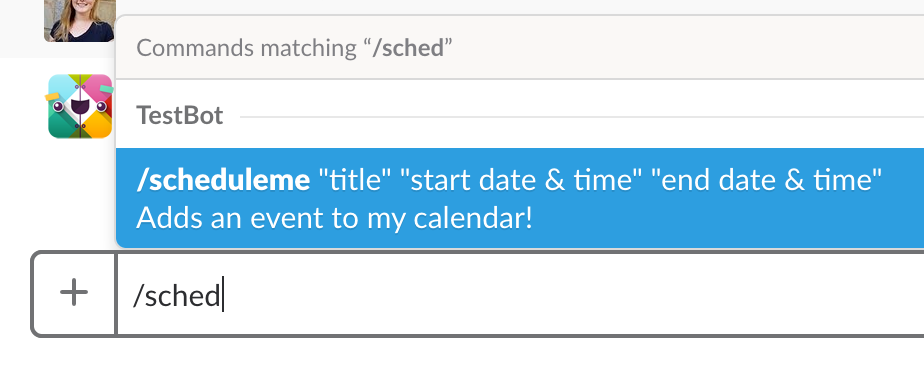
Add a short description to help you remember what this command does. This will pop up in Slack when you are typing commands that match.
For mine, I put Adds an event to my calendar!
Usage Hint
This is a hint for how to properly invoke the slash command. As you can see in the screen shot above, this will also pop up when you start typing the command.
For mine, I put “title” “start date & time” “end date & time”.
The scheduler will be expecting three arguments, each in double quotes. The first argument should be the title of the event, the second should be the start date and time and the third should be the end date and time. You will see how these get parsed in when you build out the text parsing functionality in Part 4.
Click Save in the bottom right corner and you will be redirect back to your app homepage.
Step 3: Install the app in your workspace
On the sidebar, click Install App
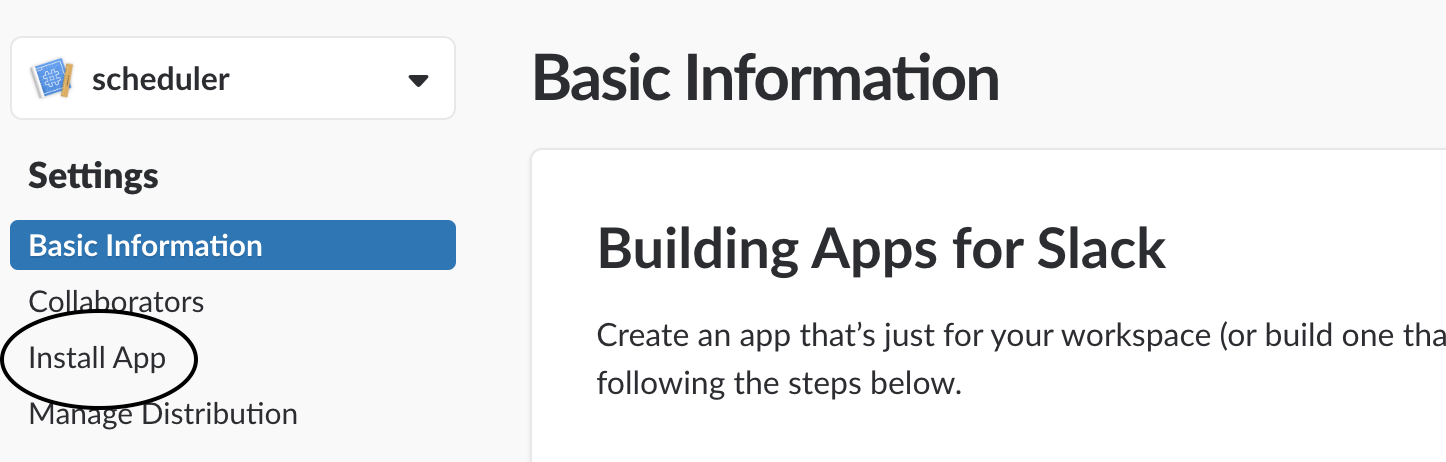
Follow the steps to install the app in your workspace. Without this step, your workspace won’t know about your app and its slash command.
Step 4: Add the /scheduleme route to your application
In the previous step, you connected your Slack slash command up to the url of your heroku app + /scheduleme. But what is /scheduleme referring to? Nothing at the moment!
Let’s fix that. In your file app.py lets add another route. You can add a route with the url scheduleme to match what you appended to the end of your heroku app url in the Create New Command form on Slack. You will be doing data processing in this route with the information from the slash command. To indicate that data is sent with the request, you need to add methods=['POST'] as the second @app.route parameter. The function name on line 14 doesn’t matter in this case, but for the sake of consistency, you can call it scheduleme as well.
from flask import Flask
app = Flask(__name__)
PORT = 4390
@app.route('/')
def homepage():
return "Howdy hacker!!"
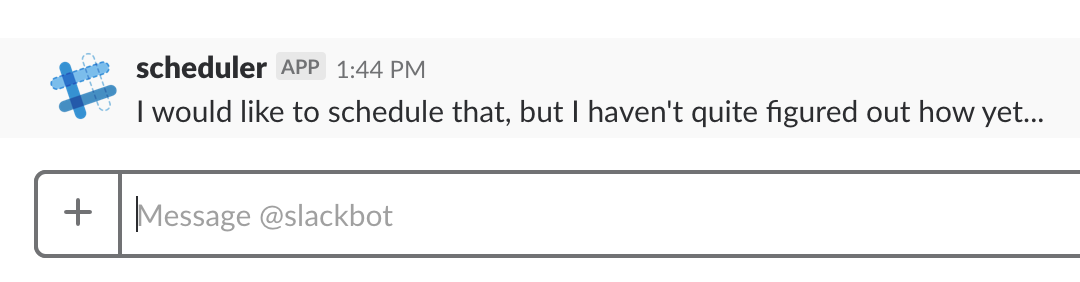
@app.route('/scheduleme', methods=['POST'])
def scheduleme():
return 'I would like to schedule that, but I haven't quite figured out how...'
if __name__ == '__main__':
app.run(debug=True, port=PORT)
This function doesn’t do much — it just returns some text. But lets deploy it to make sure you properly connected your app up to Slack.
Add, commit and push this code to master to make it live!
Then, go to your Slack workspace and type in /scheduleme and hit enter. Your bot should respond with:
You have officially made a Slack bot! Now lets add some functionality!
Debugging
If your bot responded properly, skip this section and continue onto Part 4!
If you get a 404 here, there are a few strategies to identify whats going wrong.
To see if the issue is with your application code, user a cURL request to hit that endpoint.
curl -X POST -F 'text="Post tutorial celebration dance" "Now" "Today at 11pm"' https:///scheduleme
Replace
Application Problems
curl -X POST -F 'text="Post tutorial celebration dance" "Now" "Today at 11pm"' https://127.0.0.1:4390/scheduleme
heroku logs --tail -a ;
Connection Problems
/scheduleme does the command help pop up? If not, your app likely has not be installed to your workspace. Make sure Step 3 was completed properly./schedulemeWhen you use the slash command, you are going to send some text with it. In this step, you’re going to parse that text and make sure you have the correct number of arguments.
Step 0: Add new dependencies
For parsing the request sent by Slack, you are going to use two new dependencies. First, you are going to import request from Flask. You will use this to access the information in the request. Next you are going to unpack the text of the request using a regular expression. For this you need to add import re to your import section.
The top of the file will now look like:
from flask import Flask, request import re
Step 1: Get the text from the request
Using the request library, you will need to get the text sent with the slash command. You can do this by adding raw_text = request.form.get('text') at the top of your scheduleme route.
Step 2: Unwrap the text
The text that is sent from the slash command is the string following the command name. For example, if you type /scheduleme "Workout" "Tomorrow at 7:30am" "Tomorrow at 8:30am" into Slack, the text that you will get in the previous step will "Workout" "Tomorrow at 7:30am" "Tomorrow at 8:30am". It is important to note that this text is wrapped in single quotes with each of the three components wrapped in double quotes. You can use a regular expression to unwrap the text from single quotes and put all the components into an array.
text_array = re.findall(r'"(.*?)"', raw_text)
Step 3: Error handling
You should make sure that you have the proper number of arguments and warn if not.
if len(text_array) != 3:
  return 'The format is /scheduleme "[title]" "[start date & time]" "[end date & time]"'
Step 4: Pull out event components
Finally, lets pull out the different components from the array and give them better names.
title, start, end = text_array
Then to make sure this is all working swimmingly, you can pass them all to a return statement like:
return 'Sweet I parsed the title: {}, start: {} and end: {}'.format(title, start, end)
At the end of this section, your app.py file will look like:
from flask import Flask, request import re import os import dateparser import requests

app = Flask(__name__)
PORT = 4390 @app.route('/')

def homepage(): return "Howdy hacker!!"
  @app.route('/scheduleme', methods=['POST'])

def scheduleme():
  raw_text = request.form.get('text')
  text_array = re.findall(r'["“”‘’'](.*?)["“”‘’']', raw_text) if len(text_array) != 3: return 'The format is /scheduleme "[title]" "[start date & time]" "[end date & time]"' title, start, end = text_array return f'Sweet I parsed the title: {title}, start: {start} and end: {end}' if __name__ == '__main__': app.run(debug=True, port=PORT)
Add, commit and push this code! To test it, type in a full /scheduleme command to Slack like:

and you should see:

This is your last part — hooray you are almost finished! In this last step, you’re going to sent the request to the Nylas API that will create an event on your calendar.
Step 0: Access the config variables in your code
To access config variables in your code, you will need to add another dependency, os. Add the line import os to the bottom of your import statements.
Next, lets use os to pull the values of your config variables from Heroku into your code. Replace the return statement with:
calendar_id = os.environ.get('CALENDAR_ID') assert calendar_id is not None, 'Missing `CALENDAR_ID` config variable'
access_token = os.environ.get('ACCESS_TOKEN') assert access_token is not None, 'Missing `ACCESS_TOKEN` config variable'
timezone = os.environ.get('TIMEZONE') assert timezone is not None, 'Missing `TIMEZONE` config variable'
Step 1: Build request components
You are going to use the requests library to send the request to the Nylas API. Add import requests to your import statements. You are also going to use dateparser which takes a variety of inputs for example, “Today at 3pm”, “12/31/2018 at 11:30pm”, “Friday at 9am” and turns them into datetime objects. Using this library gives you more flexibility for what you can type in as the start and end components of the slash command. Add import dateparser to your import statements.
The request is comprised of a few components — a URL, headers and json. First, you will create a dictionary of the timezone_settings. You will pass this into dateparser.parse() to indicate that you want the date to be parsed into a timezone aware datetime object.
timezone_settings = {'TIMEZONE': timezone, 'RETURN_AS_TIMEZONE_AWARE': True}
Now you have all the information to create the meat of the request, the json argument. For this, you will create a dictionary with calendar_id, title and when keys. The when dictionary has two keys start_time and end_time.
json = {
  'calendar_id': calendar_id,
  'title': title, 'when': {
    'start_time': int(dateparser.parse(start, settings=timezone_settings).timestamp()),
    'end_time': int(dateparser.parse(end, settings=timezone_settings).timestamp())
  }
}
There’s a lot going on in the values of start_time and end_time! The first step, dateparser.parse(start, settings=timezone_settings), is parsing the string text into a timezone aware datetime. Then, .timestamp() is turning it into a unix timestamp. This timestamp is a float so the final step is turning it into an integer with int().
The final building block for the request is the headers where you will pass in the access token to prove that you have authorized your account.
headers = {'authorization': access_token}
Finally, bring all these pieces together and wrap it in a a try except block to capture any exceptions.
try:
response = requests.post('https://api.nylas.com/events', headers=headers, json=json)
if response.status_code == 200:
  return f'Wohoo! {title} was scheduled from {start} to {end}'
else:
  return f'Error! Our response has a status of {response.status_code} and text {response.text}'
except Exception as e:
  return f'An exception {e} occurred creating the event!'
Use the requests library to make a post request to the URL 'https://api.nylas.com/events' passing in the headers and the json as key word arguments.
Your app.py file will end up like
from flask import Flask, request import re import os import dateparser import requests

app = Flask(__name__)
PORT = 4390 @app.route('/')
def homepage():
return "Howdy hacker!!"

@app.route('/scheduleme', methods=['POST']) def scheduleme():
raw_text = request.form.get('text')
text_array = re.findall(r'["“”‘’'](.*?)["“”‘’']', raw_text) if len(text_array) != 3: return 'The format is /scheduleme "[title]" "[start date & time]" "[end date & time]"' title, start, end = text_array calendar_id = os.environ.get('CALENDAR_ID') assert calendar_id is not None, 'Missing `CALENDAR_ID` config variable' access_token = os.environ.get('ACCESS_TOKEN') assert access_token is not None, 'Missing `ACCESS_TOKEN` config variable' timezone = os.environ.get('TIMEZONE') assert timezone is not None, 'Missing `TIMEZONE` config variable' timezone_settings = {'TIMEZONE': timezone, 'RETURN_AS_TIMEZONE_AWARE': True json = { 'calendar_id': calendar_id, 'title': title, 'when': { 'start_time': int(dateparser.parse(start, settings=timezone_settings).timestamp()), 'end_time': int(dateparser.parse(end, settings=timezone_settings).timestamp()) } } headers = {'authorization': access_token} try: if response.status_code == 200: return f'Wohoo! {title} was scheduled from {start} to {end}' else: return f'Error! Our response has a status of {response.status_code} and text {response.text}' except Exception as e: return f'An exception {e} occurred creating the event!' if __name__ == '__main__': app.run(debug=True, port=PORT)
Add, commit and push this. Yay, your Slackbot is complete! Head over to Slack and enter /scheduleme "Post tutorial celebration dance" "Now" "Today at 11pm". Then, head over to your calendar and you will see a well deserved celebration dance for scheduled, appropriately, for the rest of the day.
If you run into any issues along the way, checkout the debugging section for help!
This is a basic scheduler Slack bot — it just adds an event with a title. The Nylas API lets you create events with a lot more information associated with them. Some cool extensions would be to add the functionality to support:

Agentic AI has moved past the whiteboard phase. In public conversations, the focus is still…

In our CTO’s post, we argued that AI systems fail when the data they depend…

In our CTO’s post, we argued that trustworthy communications data is the foundation for AI…
Annie grew up in the Bay Area and studied CS and Psychology at Yale. She enjoys knitting and jogging slowly through Golden Gate Park.